Manage Schedules
There are times where you need to have more than one schedule. Maybe you want to try different way of doing things or you need one for a different day of the week. ClassMap allows you to create as many schedules as you need.
In this article
Create a new schedule
- Hover over the Schedule main menu item and tap on New Schedule.

- Enter the name of your new schedule.
- Save your newly created schedule.

Copy from existing schedule
When creating a new schedule, you might want to bring over some items from your existing schedule.
To the right of the Schedule Toolbar, you’ll find the Copy Schedule button
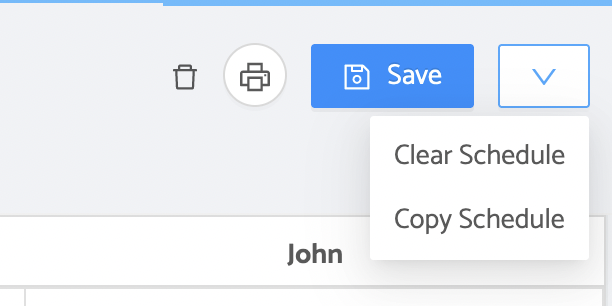 You have the option of copying over the following from your existing schedule.
- Students
- Times
- Everything (student, times and assignments).
Just select which items you would like to bring over, enter the name of your new Schedule, click Save and ClassMap will copy over your selected items.
Clear a schedule
Sometimes, it's better to clear out some items or start from scratch. To do so:
- To the right of the Schedule Toolbar, you’ll find the Clear Schedule button

- You’ll have the option of deleting the whole schedule or only some items.


Delete/rename a schedule
- Tap on the Edit icon on the Schedule Toolbar.
- Enter your new schedule name.
- Hit Enter to save those changes